
Today I decided I needed to use the spiral sliced smoked Smithfield ham that I had in the refrigerator. The package did not contain a "ready to make" glaze so I dove into the depths of the pantry. After jostling the contents, I arose victorious with a jar of Smucker's Apricot Preserves. I knew I had some crushed pineapple still in the refrigerator so combined the jar of preserves with the pineapple and some brown sugar and set them to heat on the stove. After heating to a syrup consistency, I covered the ham with about half of the sauce and reserved the other half for dipping. (I would later combine part of this reserved sauce with some horseradish for my use. The rest was left for the rest of the family to enjoy horseradish-less.)
While this cooked, covered with aluminum foil, at 325 for 1 hour, I set about choosing the rest of the meal. I was hoping for some stuffing or even mashed potatoes but found my cabinet was lacking in both departments. I did discover I had a box of radiatore pasta so decided to make some macaroni and cheese to have with the meal. 1/2 stick of butter melted in a sauce pan and combined with 1/4 cup of flour and 3 cups of shredded fiesta blend cheese. Add about 2 cups of milk and stir to combine until cheese is thoroughly melted. Drain pasta and stir sauce and pasta to combine. Add about 1 cup of mozzarella cheese and stir until melted. final accompaniments were some green beans for the boys, some seasoned cabbage for me and my daughter. I had a loaf of Everything French bread in the cupboard so I sliced that, buttered and sprinkled with garlic and Italian Seasoning. I then increased the temperature of the oven to 425, uncovered the ham and baked the ham on the bottom rack with the pan of bread on the top rack for 5 minutes.
Dinner is served!
Monday, December 3, 2012
Saturday, December 1, 2012
Advent Calendars and a Word of Caution
You may have guessed, by now, that we are not professional crafters. We love crafting, but we have by no means perfected the "art", so to speak. What does this mean for you? We make lots of mistakes and willingly share them with you as a lesson in what not to do. Be sure to look for our lesson at the end of today's craft.
My children have always enjoyed their annual Advent Calendars (as my sisters and I enjoyed them when we were younger, too). While you can find them in the dollar stores from time to time, they almost always have a picture of santa or the North Pole on them. Some years we have found them to contain less than tasty treats or treats from last year in some stores (large chain grocery/soft goods stores are good for that trick). Our other complaint with these treats is that they are made to be disposable (although, the plastic piece inside can be useful for making homemade chocolates - free candy mold!). This year we decided to look for a way to make our own advent calendars with the eye to re-use them in years to come.
With the help of my mother, we spent a great bit of time searching Pinterest and found a wide array of ideas. One thing I love about Pinterest is that I will never find a shortage of crafting ideas and fun. One thing I regret about Pinterest is that I will never have enough time and resources to try them all. Anyway, we found ideas for the calendars of the simplest nature (involving 24 pieces of paper with numbers 1-24, punch a hole in the corner, add a ring and voila, you have a countdown calendar) to beautiful examples of creation involving wood, time (and sometimes talent) that we just didn't have. Finally, one day, mom ran across an idea using matchboxes. Now, I wish I could say with certainty that the link below was "the" original source of our inspiration. But, truth be told, I simply cannot recall. We looked at so many versions of these things, I cannot recall which one "caught our attention." I can say, with certainty, that while the one was saw on a famous crafters website is too darling for words; it was not the one that caught our eyes. In fact, had it been the first one we saw, we probably would not have given it a second look since that talented crafters stuff is so far above my own artistic capabilities (more on that another time).
Below is a picture montage of the basic instructions with a word of caution at the end. Remember that my philosophy is that a recipe is a suggestion, so it is with crafting. Ours is simply meant to be a suggestion, a springboard in a manner of speaking. If you choose to try your hand at this craft, do not feel confined to our list of supplies, techniques or designs. Take it and make it your own. We would love for you to share your results and ideas with us, we would love to see how things turn out for you!
24 small matchboxes (it would be great if you could find strike anywhere matches since you will have a LOT of matches without a way to strike them, otherwise...we couldn't find them so we have a bunch of matches with only a couple of boxes leftover from the packs)
Paint (and a way to spread it, I used wedge shaped makeup sponges but brushes work too)
Glue (again, I used wedges to spread it)
Beads for the "drawer" knobs (optional)
Thread, ribbon or elastic thread/string - you need some way to pull the "drawers open since the back sides will be closed off
Needle (if you choose to thread the knobs/handles, otherwise a glue gun will work fine)
Pen or Pencil
Ruler
Card Stock
Mat board (we found some scraps of velvety finished mat board for ours)
Box Cutter, xacto knife or other sharp cutting implement (we used a box cutter and a very handy cutting tool that has interchangeable blades for different types of cuts, scoring and perforating paper - nice to have but not required)
Average Sized Rubber Bands
Candy
Scripture Scrolls (pick 24 of your favorite scripture verses to print out on regular paper and then cut apart)
-Paper
-Scissors or paper cutter (we found one at the dollar store that works fine for this)
Tiny rubber bands (we used the little black rubber bands you can find in the hair care section)
Steps
Voila, it's an Advent Calendar!
(Update: My husband decided that he didn't like the look without adding a piece of mat board to the bottom of the dressers. So, he is presently back at the task of cutting out one more piece of mat board per set and attaching the bottoms to them.)


My children have always enjoyed their annual Advent Calendars (as my sisters and I enjoyed them when we were younger, too). While you can find them in the dollar stores from time to time, they almost always have a picture of santa or the North Pole on them. Some years we have found them to contain less than tasty treats or treats from last year in some stores (large chain grocery/soft goods stores are good for that trick). Our other complaint with these treats is that they are made to be disposable (although, the plastic piece inside can be useful for making homemade chocolates - free candy mold!). This year we decided to look for a way to make our own advent calendars with the eye to re-use them in years to come.
With the help of my mother, we spent a great bit of time searching Pinterest and found a wide array of ideas. One thing I love about Pinterest is that I will never find a shortage of crafting ideas and fun. One thing I regret about Pinterest is that I will never have enough time and resources to try them all. Anyway, we found ideas for the calendars of the simplest nature (involving 24 pieces of paper with numbers 1-24, punch a hole in the corner, add a ring and voila, you have a countdown calendar) to beautiful examples of creation involving wood, time (and sometimes talent) that we just didn't have. Finally, one day, mom ran across an idea using matchboxes. Now, I wish I could say with certainty that the link below was "the" original source of our inspiration. But, truth be told, I simply cannot recall. We looked at so many versions of these things, I cannot recall which one "caught our attention." I can say, with certainty, that while the one was saw on a famous crafters website is too darling for words; it was not the one that caught our eyes. In fact, had it been the first one we saw, we probably would not have given it a second look since that talented crafters stuff is so far above my own artistic capabilities (more on that another time).
Below is a picture montage of the basic instructions with a word of caution at the end. Remember that my philosophy is that a recipe is a suggestion, so it is with crafting. Ours is simply meant to be a suggestion, a springboard in a manner of speaking. If you choose to try your hand at this craft, do not feel confined to our list of supplies, techniques or designs. Take it and make it your own. We would love for you to share your results and ideas with us, we would love to see how things turn out for you!
Matchbox Advent Calendar
Supplies Needed (for 1 calendar):24 small matchboxes (it would be great if you could find strike anywhere matches since you will have a LOT of matches without a way to strike them, otherwise...we couldn't find them so we have a bunch of matches with only a couple of boxes leftover from the packs)
Paint (and a way to spread it, I used wedge shaped makeup sponges but brushes work too)
Glue (again, I used wedges to spread it)
Beads for the "drawer" knobs (optional)
Thread, ribbon or elastic thread/string - you need some way to pull the "drawers open since the back sides will be closed off
Needle (if you choose to thread the knobs/handles, otherwise a glue gun will work fine)
Pen or Pencil
Ruler
Card Stock
Mat board (we found some scraps of velvety finished mat board for ours)
Box Cutter, xacto knife or other sharp cutting implement (we used a box cutter and a very handy cutting tool that has interchangeable blades for different types of cuts, scoring and perforating paper - nice to have but not required)
Average Sized Rubber Bands
Candy
Scripture Scrolls (pick 24 of your favorite scripture verses to print out on regular paper and then cut apart)
-Paper
-Scissors or paper cutter (we found one at the dollar store that works fine for this)
Tiny rubber bands (we used the little black rubber bands you can find in the hair care section)
Steps
- Empty the matches out of the matchboxes. We put all of ours in a quart size zipper baggie.
- Remove the inside portion of each box and set the outer portion to the side for later assembly.
- Paint (at least) one end of the inside part of the matchboxes. These will become your drawer faces.
- If you paint a thin enough layer, by the time you get to the last one, you should be able to start again at the beginning to add another layer. Keep adding layers until you achieve the color and opacity that you are looking for.
- Set these aside for later assembly and turn your attentions to the outer portions of the boxes.
- Decide on a configuration that you like. (i.e. 6x4, 4x6, 3x8, etc.) We opted for four wide by six high.
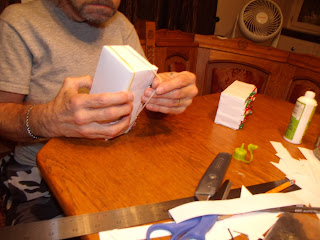
- Glue the outer boxes together in columns first, then glue the columns together to make the final configuration. (This means that we glued a stack of 6 together, then another stack of 6, and so on until we had four stuck together stacks of 6. When they were sufficiently dry we glued the stacks together side by side.)
- Set these to the side to dry and return your attentions to the inner boxes.
- Attach the drawer pulls to the drawers using your preferred method. We chose to string some plastic beads on needle and thread and then pierce the boxes with the needle and tie the string on the inside of the drawer. A word of caution here, the string did not hold as well as we had hoped so we will be reinforcing the inside knots with some glue from the glue gun. Another idea we saw later was to attach a pice of ribbon to the inside back of the drawer, tape it down along the bottom of the drawer and then weave the ribbon out the top so it looks like a tongue sticking out of the drawer. Not our favorite look, but it may hold up to more abuse.
- Re-assemble the inside and outside matchboxes in a pattern of your liking. If you used only one color of paint for the fronts, this should be quick and easy. :) (Now for the tricky part that I left to my super smart husband..)
- Measure the top (length) of the drawer configuration, write that number down. (Ours: 5 7/8")

- Measure the sides (depth) of the drawer configuration, write that number down. (Ours: 2 1/8")

- Measure the back (height) of the drawer configuration, write that number down. (Ours: 3")
 In the end, you should have Length (two times, top and bottom), Depth (two times, right and left) and Height. Measure and mark a piece of card stock width(of paper) x length(of paper) to create the cover for the drawers. Width(of paper) = Height (3") + Depth (2 1/8") + Depth (2 1/8") = (7 1/4") Length(of paper) = Length (of top) (5 7/8") + Depth (2 1/8") + Depth (2 1/8") = (10 1/8") (In our configuration, the measurements were: 7 1/4" x 10 1/8") (Pictures taken post construction so the measurements you see in the picture are not accurate for the card stock measurements.)
 - Mark and cut the card stock as shown below. You see the intersection of the two measurements? My husband made sure he didn't cut along the lines, instead cutting the paper out at an angle along the corners so that he could get two triangular wedges out of them. (So smart!) You will notice that my husband did not cut the corners out of the card stock, rather he kept the wedges attached so that he could create a fold similar to wrapping a box with gift paper (a chore that I do not attempt to do because I would never think of stuff like this).
 You should score the card stock along the corners so that you get a nice clean corner along each edge.
 - Once you have checked the fit,
 glue the card stock to "wrap" the matchboxes
  *Caution: do not place glue on the portion that will cover the back of the "dresser" (see below this post to see why. You should place glue here,
  here,
here,  here,
here,  and here.
  But never, under any circumstances, place glue inside the big X.
 - Make sure you fold the triangular tabs in like you are wrapping a gift. You can have them on the outside like on a wrapped gift or fold them under to provide a more finished look.

- Place average rubber bands over the dresser as shown until the glue has dried.
- You can choose to stop the dresser construction here, stamp cute designs on the card stock or repeat the cut on a piece of wrapping paper to finish the look. The card stock is important to add to give the construction some durability and reinforcement. Any other embellishments are strictly aesthetic.
- If you decide to finish the construction by adding the mat board, cut pieces of mat board to cover the sides, back and top only. This should give you a total of four pieces (two for the sides, one for the back and one for the top). Be sure to add a slight bit to the measurements to allow for the thickness of the mat board. It is better to cut the board to slightly larger than what you need than to cut it too small. If it is a bit large, you can shave away the excess by taking a small bit off of one edge at a time until you have the desired shape and size. These pieces can be glued with a glue gun to the card stock. It is okay to glue these onto the back of the card stock since the card stock forms a barrier between the drawers and the glue. We used a glue gun here instead of craft glue because the card stock is decidedly heavier than card stock and the glue needs to dry faster here. You could get away with just a glue gun for the entire project to make things simpler. We would have done so but I had mislaid the glue gun and didn't find it in time to do the first several steps.
- Once construction is complete you can fill the boxes with candy and one scroll per drawer.
 We bought a variety of candies for this year. Next year, though, we will probably stick with the mini candy bars since the gummy slices and the boston peanuts were frequently too large for the drawer to close without shooting a piece of candy across the room. (New game anyone?)
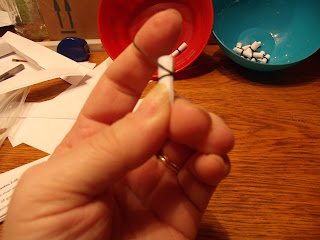
 - To make the scrolls, I asked my pastor for help coming up with a list of suitable verses that would make the Bible more personal to my children (and fit on a mini scroll). We decided not to do the Christmas story for this since they get this in so many other ways every way. Instead, we chose to go with other verses that they may not be so inundated with. (I wasn't quite sure how my 17 year old would react to the scrolls, but she seemed to be at least interested in them. She even asked if she and her 11 year old brother have the same verses each day.) Once we had a list of more than 24 verses, we read through and picked our favorite 24. I cut and paste them into a single document and then printed two copies (since we were doing two sets). While Michael finished construction, I sat with the pages of verses and cut them apart, rolled them into tiny scrolls


 and closed them with the tiny black rubber bands.


Voila, it's an Advent Calendar!
(Update: My husband decided that he didn't like the look without adding a piece of mat board to the bottom of the dressers. So, he is presently back at the task of cutting out one more piece of mat board per set and attaching the bottoms to them.)

And now, as promised, our lesson for today's craft....
As you saw above, we were very specific about not gluing the the area with the large X. The reason we wanted to be sure to mention this was because we did it. We were hurriedly trying to finish the project so that we could carry it with us to church one Wednesday evening. Our pastor was very kind to help us find our scripture verses. Our request peaked his interest. He has two sons and they both love Advent Calendars as much as our children. He was very interested to see what we were doing since he has the same difficulties with finding appropriate Advent Calendars each year. Well, we were trying to get that last (at that time) bit of construction done so that we could show them to our pastor. Without thinking (on either of our parts), Michael spread glue over the entire piece of paper and attached it to the matchboxes. We didn't do just one that way, either. So, off we go to run errands before church and while on the way to church from the last errand, I pick up the first set and start tugging on drawers. After nearly ripping the handles off of several drawers (come to think of it, that is probably what weakened the knobs). When that was less than fruitful, I picked up the other assembly racking my fibro fogged, fuzzy brain trying to think what could possibly be wrong with the drawers. I think it dawned on us both at about the same time. I asked, "Do you think the drawers got stuck to the back of the card stock when we attached the outer cover?" Michael looked at me pretty sheepishly and just nodded. I was pretty upset with myself over this one and was ready to toss it all out and try again. Michael rescued the assemblies from certain doom and promised he could fix it. This is what the back of one looked like after he spent a great deal of time with an xacto blade, meticulously cutting each and every drawer away from the card stock and then removing the mangled up back from the rest of the dresser. He then started his task back over from the very beginning. This fiasco is why we opted to add the mat board in the end. We were terrified at how they would look in the end without something to cover it up. Ah, well....lesson learned. And now our mess is your warning, too. :)

We hope you found this tutorial helpful and enlightening.
God Bless and Keep You Close,
Michael and Mistie - the Crafting Kelleys
Subscribe to:
Comments (Atom)